5. Ethereum Scaling#
In this tutorial we discuss the largest hurdle to the wide-scale adoption of cryptocurrencies, which is that transactions on the main chains can cost a significant fraction of the transacted amount, especially for smaller amounts. We define the problem and look at the solutions that have been created and how to use them.
The problem with gas#
Looking back at the previous tutorials, we spent about 4 USD converting Bitcoin to Ethereum.
These are some fairly high fees for a technology that is trying to take on Visa and Mastercard. It is still cheaper than international transfers between banks, but then again there are other options like Revolut or Wise which are easier to use, and also have lower fees.
Crypto enthusiasts are often known to reference the face that El Salvador has adopted Bitcoin as an official currency, and argue that this is evidence that, countries like Lebanon or Turkey, where the ‘traditional’ economic structures do not support the population, would do well to follow in El Salvador’s footsteps. If you want to read more about how cryptocurrencies are being used to support purchases/safer depositing in volatile economies, this article is a good place to start:
Crypto offers Lebanon a lifeline in face of continuing financial crises
However, in spite of the fact that crypto offers some solutions to the problems we see in these economies, it seems unlikely though that in these countries - where the median wage is below 500 euros a month - people would be willing or even able to pay for goods in a currency where the fees for payment can add 10% or more to the total price of a purchase.
The problem with throughput#
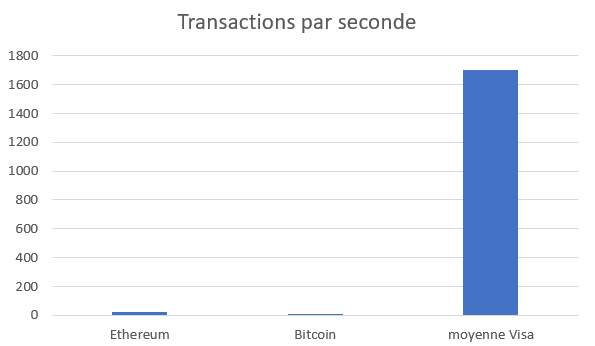
The following graph should illuminate why this is the case:
Bitcoin can handle about 7 transactions per second and Ethereum can handle about 20. Meanwhile Visa, the largest payment processing network in the world, averages 1700 transactions per second, and claims that their systems can reliably handle 24.000 transactions per second. Their servers are even reported to be able to handle up to 56.000 transactions per second. From tutorial 2 and 3, you will remember that the gas fees on Bitcoin and Etheruem are supposed to be set by the market, for people wanting their transactions included in the network. However, put simply, if 21 people want their transaction included in an Ethereum block this second, this ‘people led’ pricing cannot be used. Therefore, the gas fee will be raised - algorithmically or by the other users - significantly enough to make 1 person reconsider whether they really need that transaction included right away.
Why not simply design blockchains to accommodate higher throughput? The reason is that increasing the number of transactions per second can compromise security and decentralisation. Achieving higher throughput typically demands better hardware to process the increased volume of transactions and greater bandwidth to propagate those transactions across the network. This can potentially reduce the overall security and decentralisation of the blockchain.
Solutions#
Layer 2, colloquially shortened to L2, is the proposed solution to this conundrum of low throughput, leading to high fees. Whereas Layer 1 or L1 is commonly used to refer to the “base” blockchain, like the Ethereum or Bitcoin blockchain, L2 stands for separate blockchains that in DeFi jargon “inherit the security of L1 while extending the L1 blockchain”. What this means is that L2 blockchains are as decentralised and hacking proof as the L1 blockchains; but they provide services, such as higher throughput, that L1 blockchains cannot provide. A simple way to think of L2 blockchains is to think of them as executing the code and then the L1 blockchain as saving the result.
Note on terminology
There is a lack of consensus regarding the precise definition of ‘Layer 2’ in blockchain terminology. Broadly, and in alignment with the approach taken in this tutorial, Layer 2 refers to any scaling solution on a blockchain. In more technical contexts, there’s a distinction made between various scaling solutions, categorising one type as ‘Layer 2’ and another as ‘side-chains’.
Rollups#
There are various different typologies of L2 solutions, and the distinctions become quite technical quite fast. However, the ones that are most popular and promising on the Ethereum blockchain use something called a ‘rollup’. The idea is that you have a smart contract within the L1 blockchains that serves as the bridge between L1 and L2 blockchains. If you transact with your money on the L2 rollup blockchain, these transactions are not saved to the Ethereum blockchain immediately; rather, they are executed on the rollup blockchain for cheap or even free (oftentimes subsidised by proceeds from the sale of governance tokens). To save these transactions to the Ethereum blockchain, the rollup contract, after a certain period, gathers all the transactions it hasn’t yet recorded on the L1 blockchain. It consolidates and compresses them before submitting them as a batch to the L1 chain (this is the ‘rolling up’ element). This process can be likened to sharing the gas fee for your transaction with all the others included in the batch.
As a side note, Bitcoin employs a somewhat distinct approach with its widely adopted ‘Lightning network,’ mainly due to the greater complexity of implementing smart contracts on the Bitcoin blockchain.
Problems with L2#
Although L2 seems to be a somewhat magical solution to all ills that Blockchains in general face, there are some serious downsides. The first issue is naturally the further complication of an already convoluted system - although most of these complications are not experienced by the users directly.
Liquidity#
The first issue that arises with multiple different competing L2 solutions is that, funnily enough, nobody can agree on which one to use - there is no consensus. This is detrimental for the simple reason that you cannot have your transactions listed on multiple L2 solutions (it wouldn’t be desirable either as that would lead to double spending problems). This means that liquidity becomes fragmented, and as explained in previous tutorials, liquidity is key when it comes to the efficient functioning of DeFi. Every dollar that is deposited into a liquidity pool on Uniswap in Polygon (a L2 solution) is one dollar of liquidity that could have been added to the liquidity pool on the Ethereum main-chain or to a liquidity pool on Avalanche (a different L2 solution). This leads to higher slippage and more opportunities for price manipulation.
On the flip side, switching between different Layer 2 (L2) solutions can present challenges and costs. Currently, if you need to transition from Polygon to Arbitrum, for instance, you must first return from Polygon to the Ethereum Layer 1 (L1) and then proceed from there to Arbitrum Layer 2. However, it’s worth noting that many brilliant researchers are actively working on addressing this issue.
Click for more detail on L2 interoperability challenges
Currently, most L2 solutions are using something called ‘optimistic rollups’. The basic idea is that the L2 solution assumes that all transactions that have been submitted to it are valid, by default. Non-valid transactions have to be manually challenged - which is a relatively expensive thing to do. So for a transaction to be considered fully valid, it must remain submitted for a week or longer without anyone challenging it. This means that it is difficult to broadcast the state of an optimistic rollup L2 solution to the entire network - and have the entire network be aware of the current state at all times. The solution to this is something called ‘zero knowledge rollups’, which are mathematically incredibly interesting, but also require some mathematical challenges to be overcome before they see widespread use.
Onboarding/offboarding time#
The third large hurdle that L2 solutions face is onboarding and offboarding times. Usually, when you interact with a smart contract on Ethereum, your transactions is confirmed within a dozen or so seconds, whether that be sending money to a friend or withdrawing funds from some liquidity pool - regardless on the type of transaction. Although L2 solutions can handle a lot more transactions per second, and these transactions are basically instantly confirmed, if you want to withdraw your money from L2 and put it back on the main chain (for instance, to move your funds from a liquidity pool on Polygon onto a liquidity pool on the main chain) you have to wait for quite some time depending on the protocol being used. Some solutions do it for you in about 20 minutes, while others can take as long as a week to withdraw your money from.
Security#
At the end of the day, achieving high scalability, meaning a high number of transactions per second, while maintaining the same level of security and decentralisation as lower transaction-per-second solutions, remains a significant challenge. Unless we allocate a substantial portion of our internet infrastructure to duplicating transaction messages on a blockchain to ensure that everyone who needs them receives them, there will always be a trade-off.
This is not to suggest that Layer 2 (L2) solutions are inherently insecure. Instead, it can be thought of as varying levels of security. In the traditional financial world, for instance, we wouldn’t hesitate to carry a 2 euro coin in our back pocket. However, we’d prefer to keep a 50 euro bill in our wallet. When it comes to 5000 euros, we might be comfortable with a fintech service, while our life savings would typically be entrusted to a major bank. Layer 1 can be likened to the big bank holding our life savings, where every transaction is slow, cumbersome, and costly, but the risk of something going wrong is low. On the other hand, Layer 2 solutions enable projects and protocols to choose the level of security they desire, although they never quite fall to the level of security of a 2 euro coin in your back pocket, it is still important to check what the security tradeoffs of difference L2 solutions are. Often, the primary risk with L2 solutions is placing trust in a centralised team, similar to the trust required for a fiat-backed stablecoin.
How to connect to L2 solutions#
Before looking into what you can do on L2, let’s first go over how to get your assets onto L2 solutions. For this we will be looking more closely at what is currently the largest L2 project, Arbitrum One.
Bridges#
As L2 solutions are separate blockchains, then there is by default no intrinsic connection between the two blockchains, and they are both completely unaware of each other. This can present certain issues. We have faced the same problem before, in the first tutorial, when we traded Bitcoin on the Bitcoin Blockchain for Ether on the Ethereum Blockchain. Although Ethereum L2’s are more connected with the Ethereum Blockchain, they still require an extra step. This is what so-called bridges are for. They provide a “bridge” between the different blockchains. The idea behind L2 bridges is simple; you send some of your assets to a smart contract that ‘locks’ those assets up, and then an equivalent contract on the other blockchain transfers to you an equal amount of assets on the L2 blockchain. Technically, you are not holding the real asset, but rather something that in crypto jargon is called a ‘wrapped’ asset. You can think of this as a pegged, but otherwise unrelated currency. This is similar to how Bitcoin on the Ethereum Blockchain is not true Bitcoin, but a token on the Ethereum network that happens to be pegged to Bitcoin.
This also means that bridges are fairly dangerous. First of all, they’re fairly complicated pieces of code that need to account for the peculiarities of two blockchains rather than just one, meaning they’re more likely to have bugs in them. Secondly, they are often fairly centralised, meaning that it only takes a few bad actors to bring the entire operation down. These are not theoretical concerns either; bridges are very often attacked, and successfully at that, by malicious actors.
What Went Wrong: Biggest Blockchain Bridge Hacks - LimeChain
In spite of this, it’s crucial to highlight that bridges connecting the Ethereum Layer 1 (L1) blockchain to Layer 2 (L2) scaling solutions are generally considered more secure than bridges connecting different Layer 1 blockchains. For example, a bridge between Ethereum and Bitcoin.
The Current State of Layer 2 Bridges - Enterprise Ethereum Alliance
Transferring assets to Arbitrum One#
Note that withdrawing assets from Arbitrum can take up to a week. Only follow this tutorial if you are willing to lock your assets up for that long. Furthermore, it takes about 15 minutes to actually transfer funds to Arbitrum. Do note that it is possible to withdraw the funds sooner by going to a centralised exchange and selling your Arbitrum based funds there, although that is less fun since you’re not using blockchain technology.
First, we want to connect or ‘wallet to’ the official Arbitrum bridge at the following link
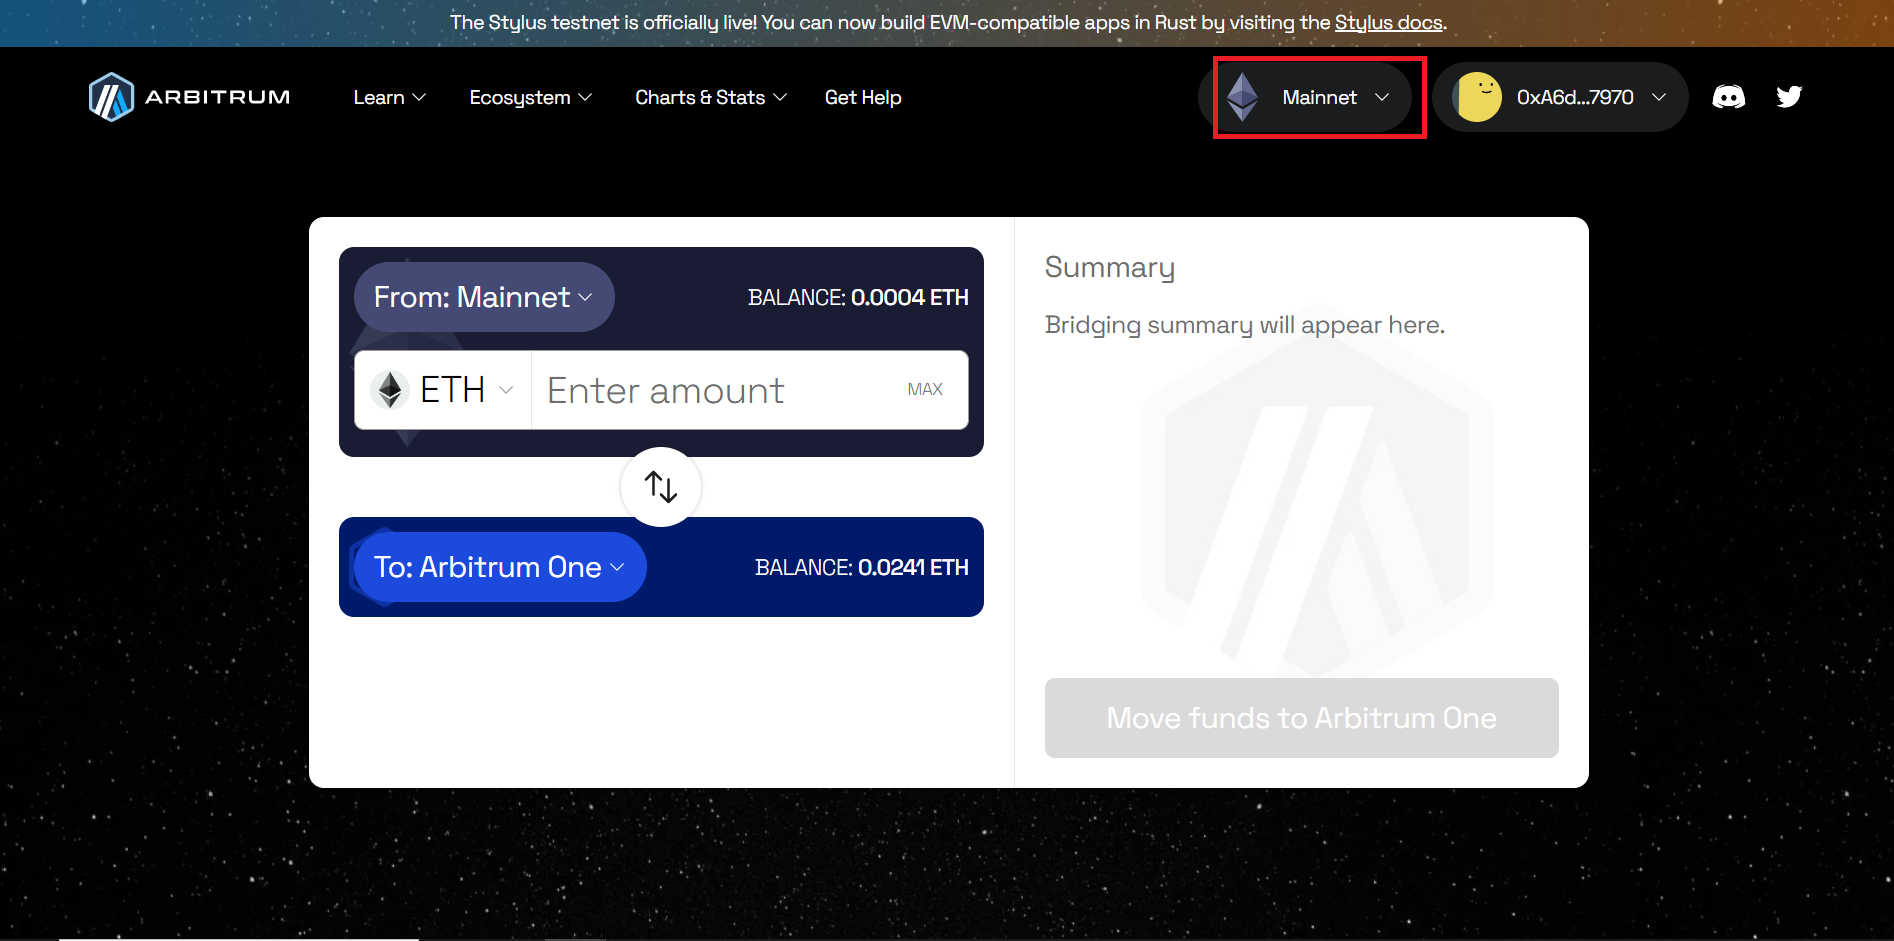
Once connected you can choose the amount that you want to transfer:
A screen will then pop up on your right, showing your funds moving to Arbitrum. Since there are multiple steps to this process it takes a bit of time to complete.

While waiting, we can explore the Etherscan transaction sending assets to Arbitrum by clicking on the transaction ID under step 1:
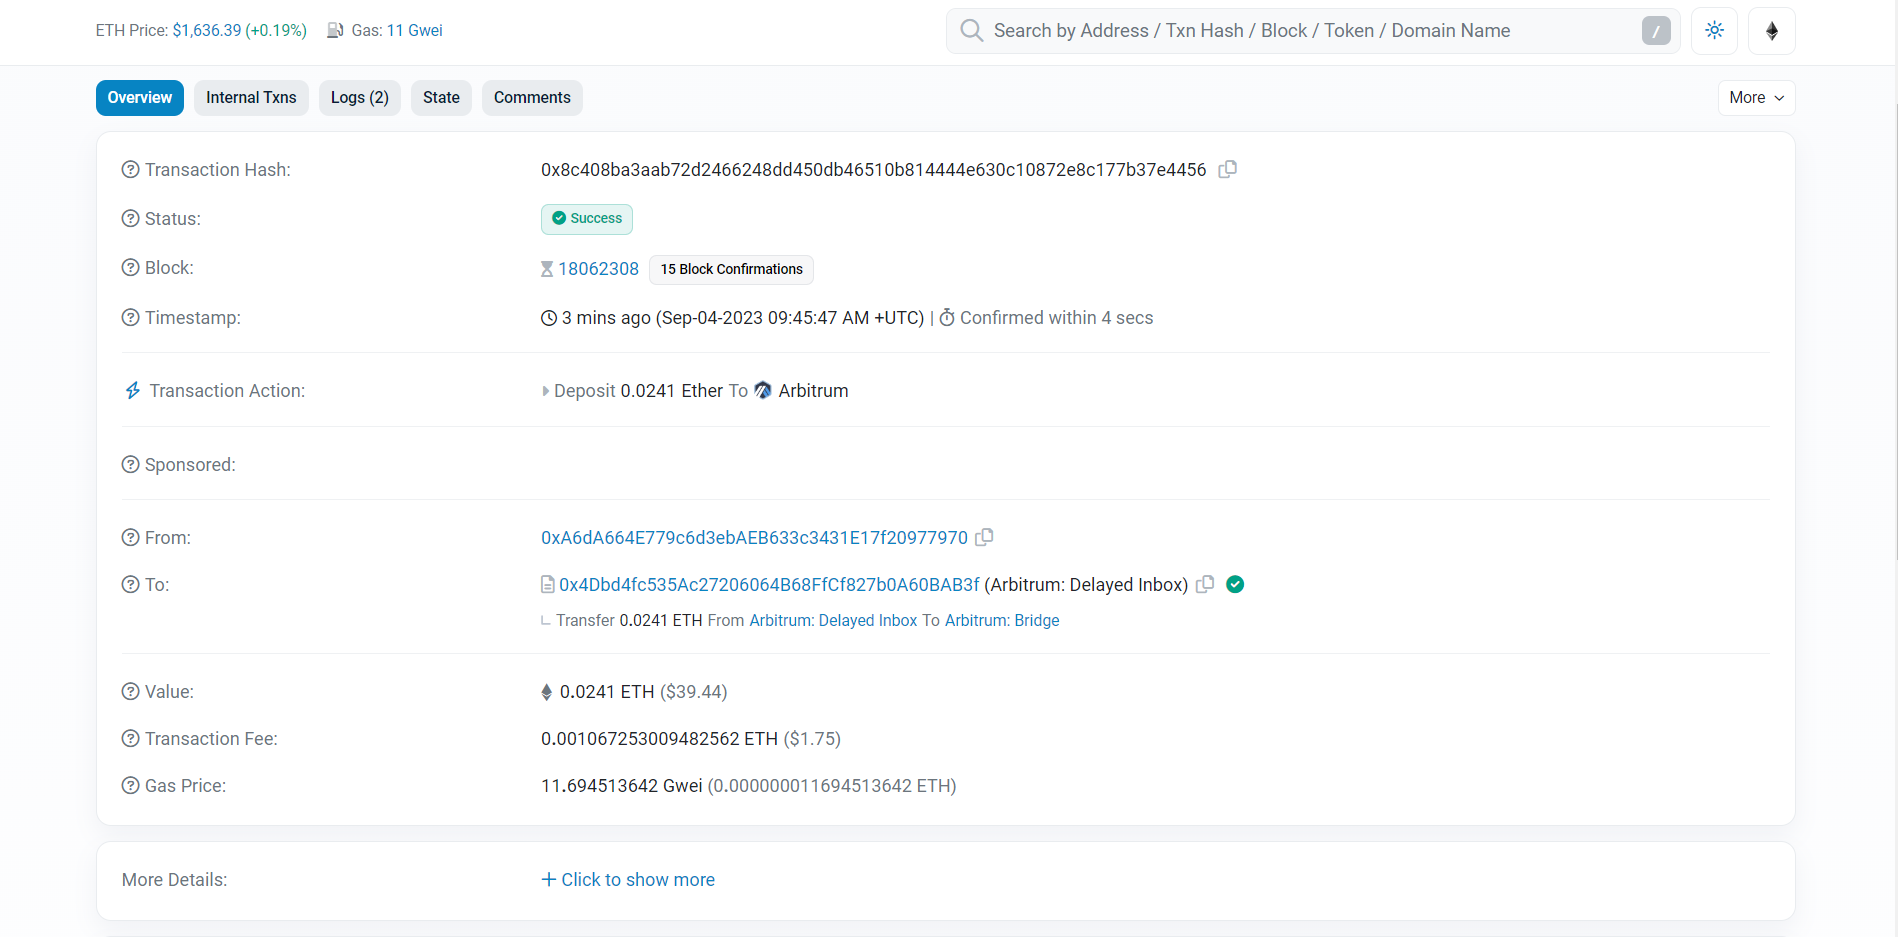
We can see that our assets were transferred to the Arbitrum ‘delayed inbox contract’, which then transferred them to the Arbitrum bridge contract. Having the ‘delayed inbox contract’ in between you and the bridge allows Arbitrum to do internal checks, and send you the money on the Arbitrum chain. If you are interested in more details on how exactly Arbitrum transactions are handled, see here:
Once Arbitrum has confirmed your transaction, your screen should look like the following:
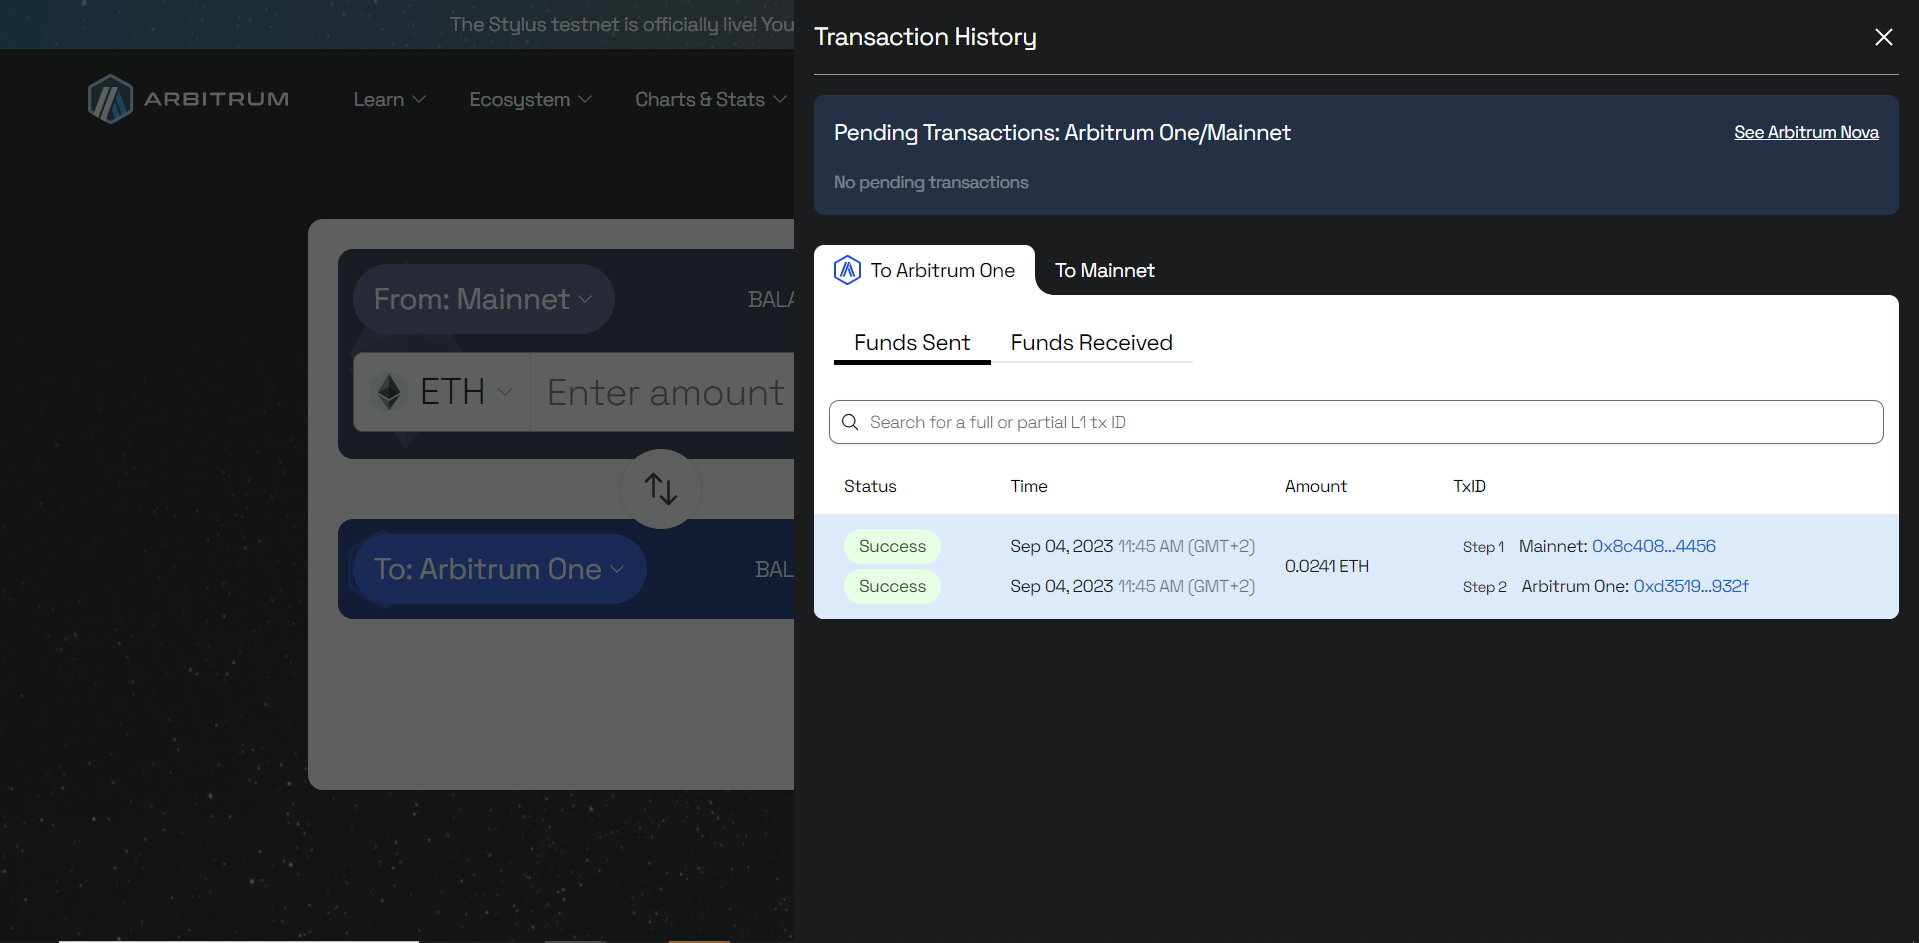
If we click on the transaction ID from step 2, we will be taken to the transaction on Arbiscan, which is the analogue to Etherscan or Blockchair, but on Arbitrum. However, if you check your wallet you will find it empty.
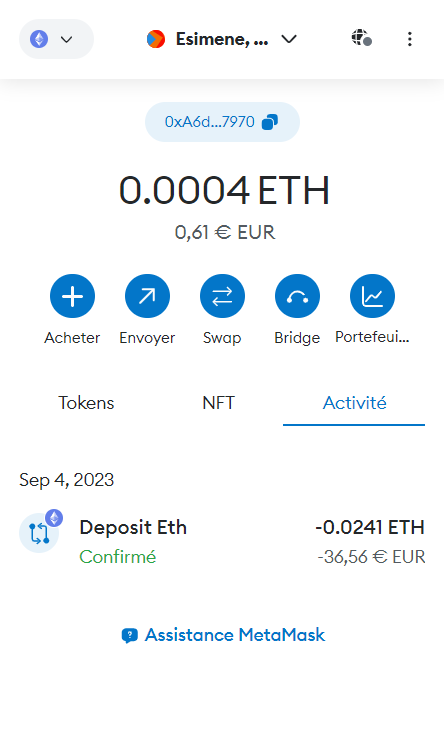
This is because we haven’t told Metamask to recognise Arbitrum. The simplest way to let MetaMask know of Arbitrum is to go back to the Arbitrum bridge webpage, close the transaction history and then click on the Mainnet button on the top right.
Choose ‘Arbitrum One’ and you will be shown the following screen on MetaMask
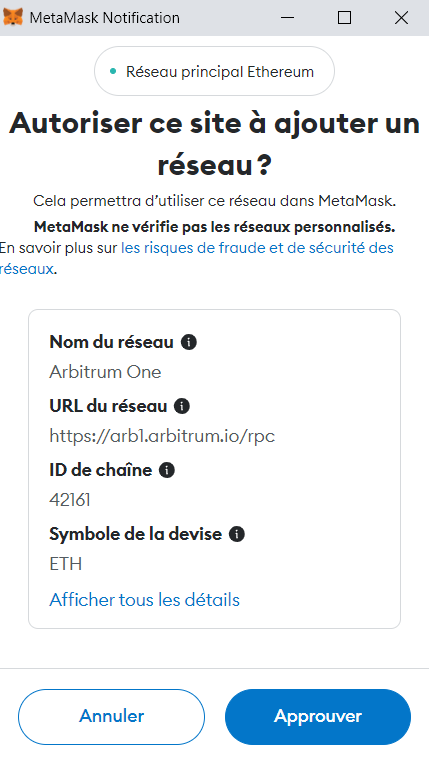
Approve the change, and change your chain to Arbitrum One. Now when you view your wallet, you will be viewing the addresses that you control on the Arbitrum blockchain. You can change back to the Ethereum Mainnet by clicking on the button on the top left and choosing Ethereum Mainnet.
.png)
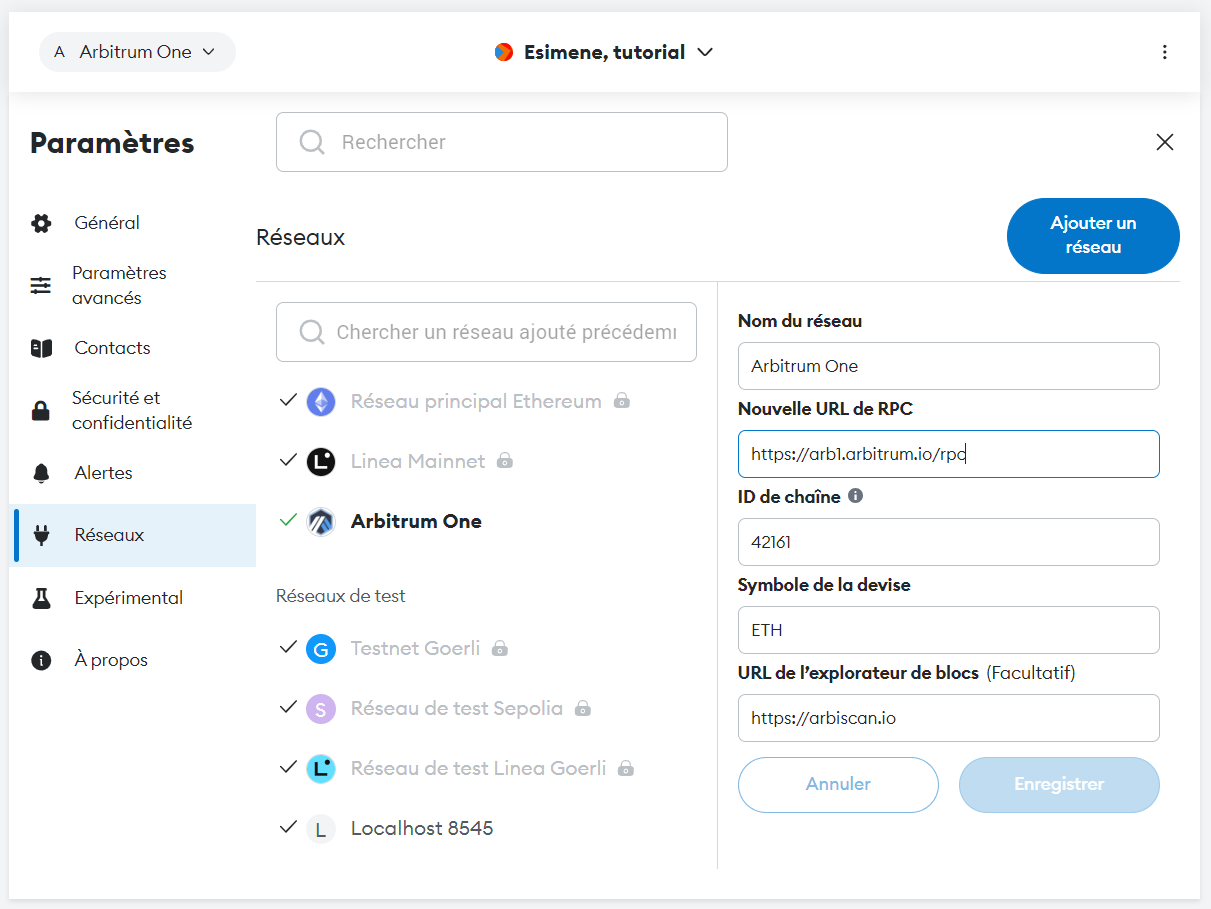
Generally, if you wish to add a network, such as a Testnet, to your Metamask wallet, you can follow these steps: access the settings, navigate to the networks tab, and input the necessary information on the right. However, Metamask often provides a preset list of networks that can be easily added.
As a simple sanity exercise, let’s compare how much it costs to convert our ETH to USDT on Arbitrum, using 1inch and Uniswap. We can use 1inch as usual, but we have to still swap it over to Arbitrum. To do this make sure that the network on the top right on the 1inch application is set as Arbitrum.
1inch - DeFi / DEX aggregator on Ethereum, Binance Smart Chain, Optimism, Polygon, Arbitrum
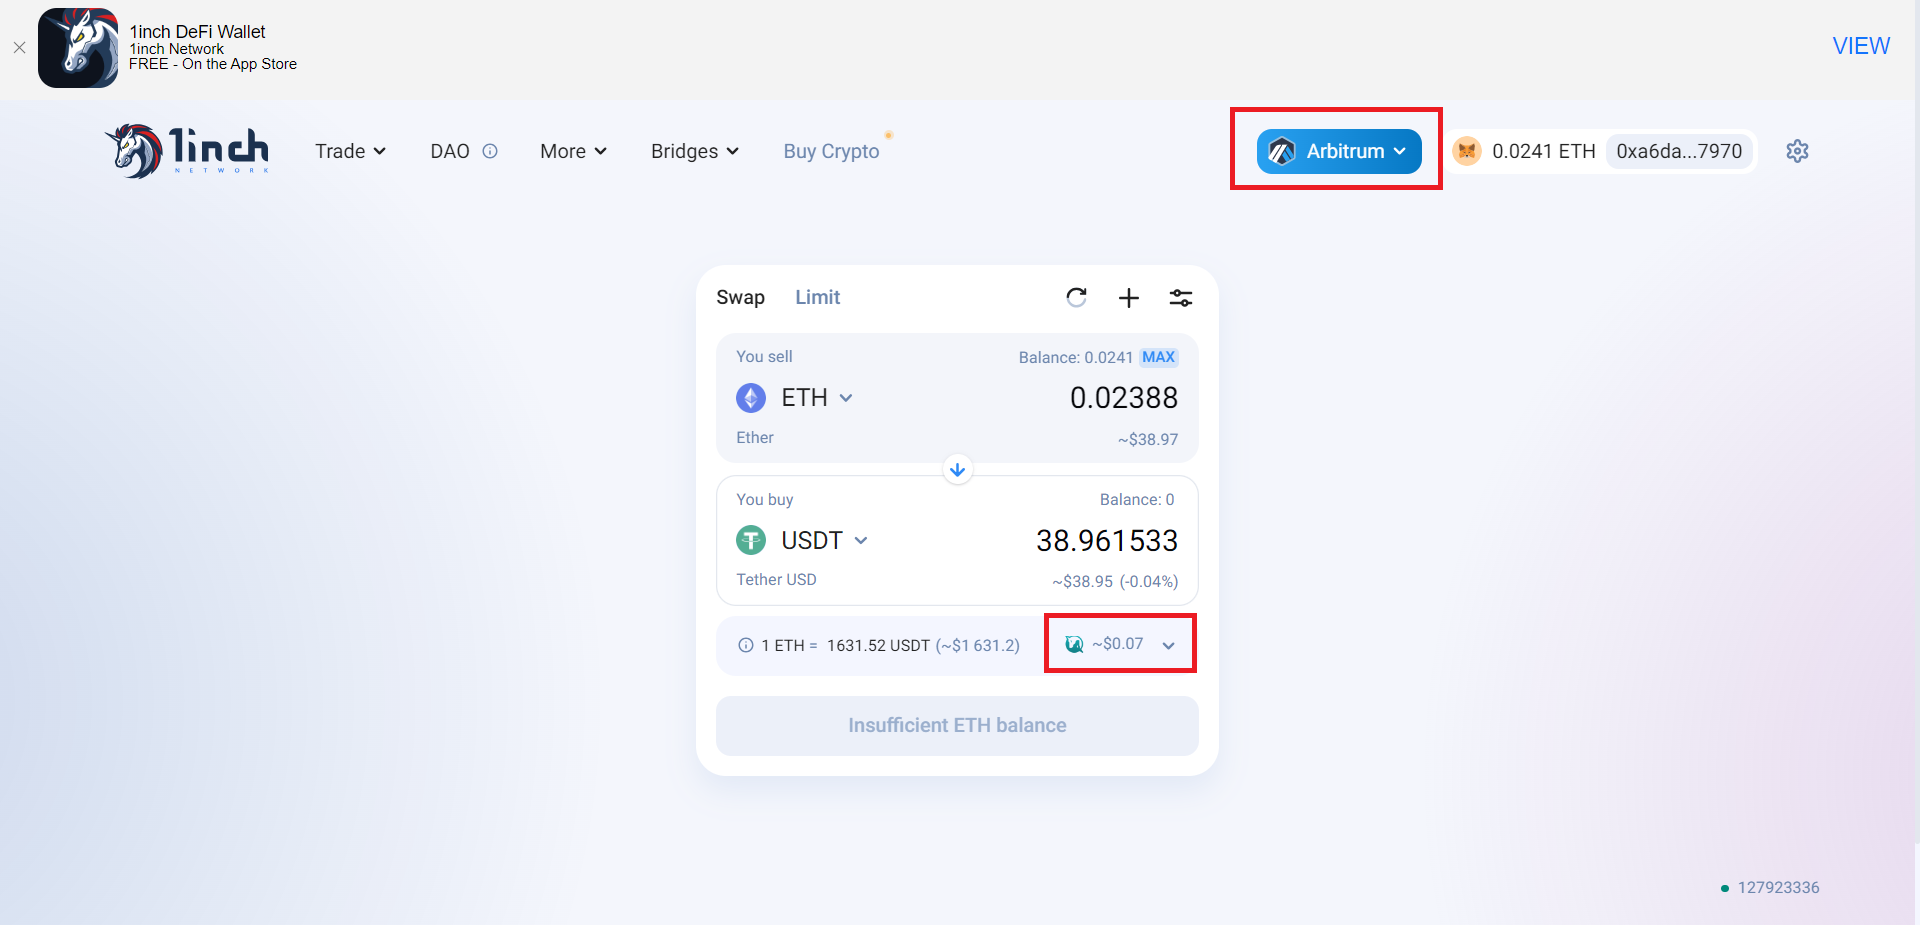
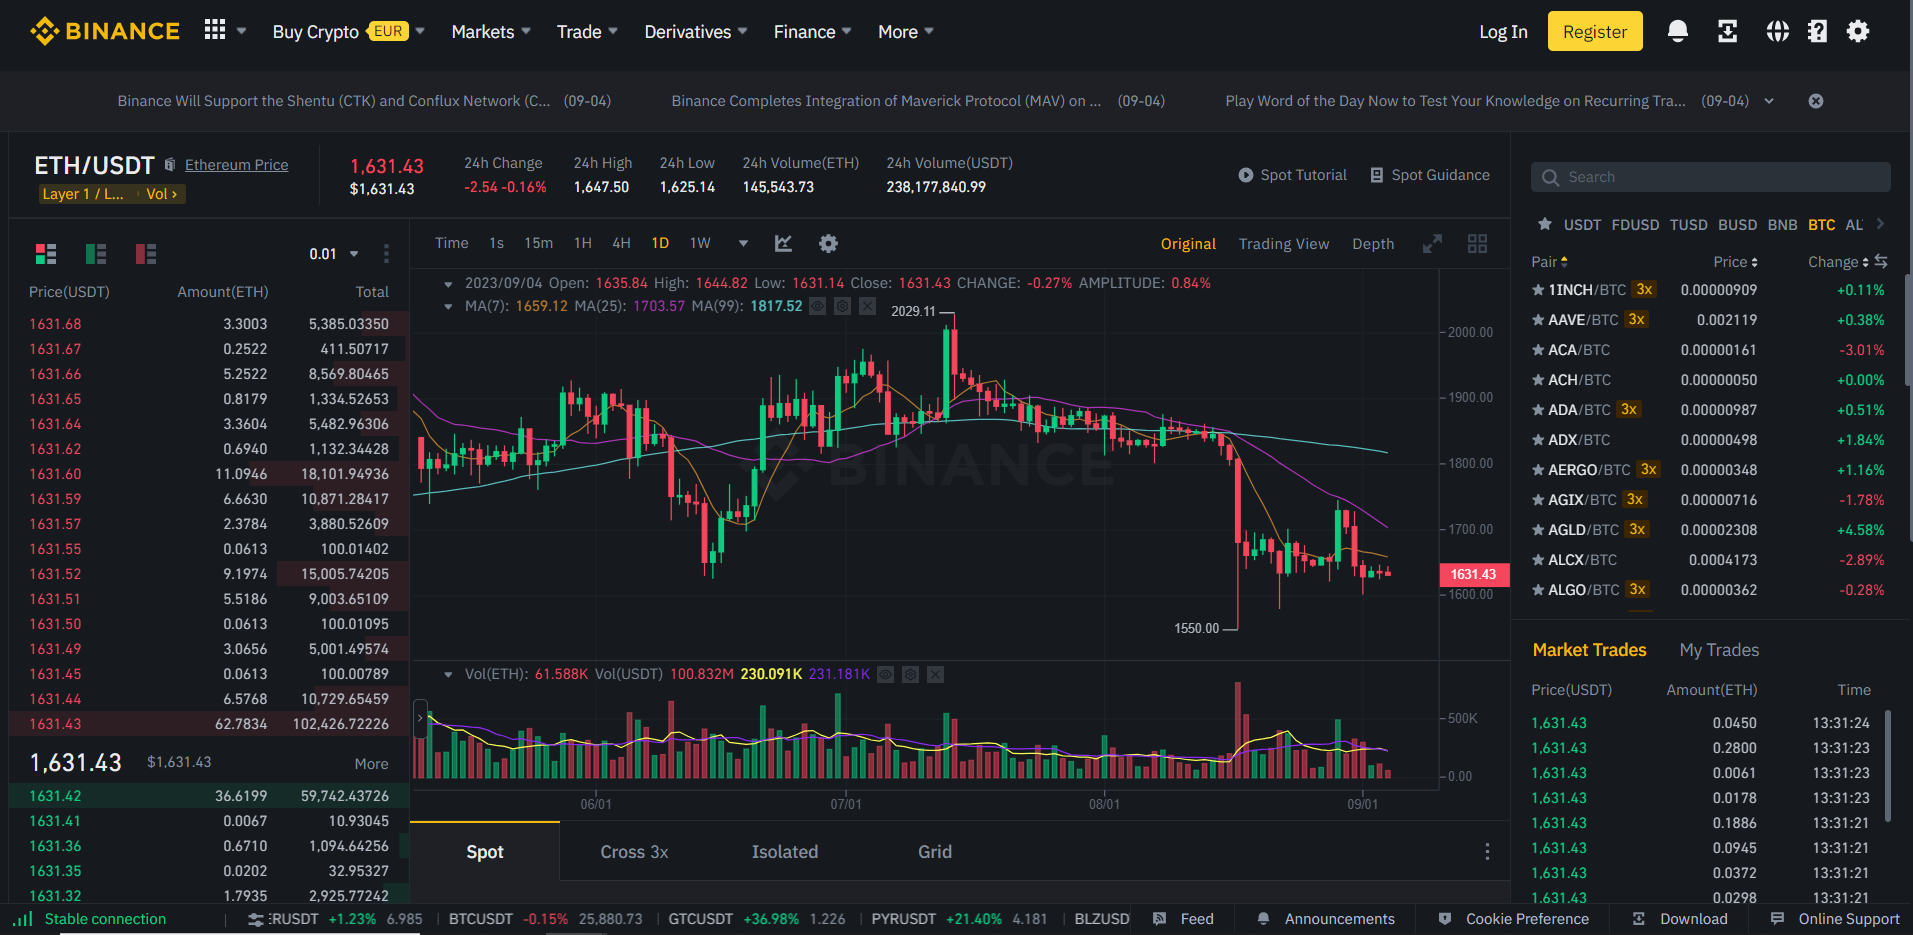
Take note of the fact that the transfer only incurs a cost of 7 cents when converted from gwei to USD. While it’s not flawless, it’s far more manageable than the $2.50 it would cost on the Ethereum mainnet. Additionally, this provides us with a price of 1631.6 USDT per ETH, whereas the Binance (a centralized exchange) spot price at the same time stands at 1631.43 USDT per ETH. Therefore, in this case, 1inch is offering a more favorable price than Binance (excluding fees).
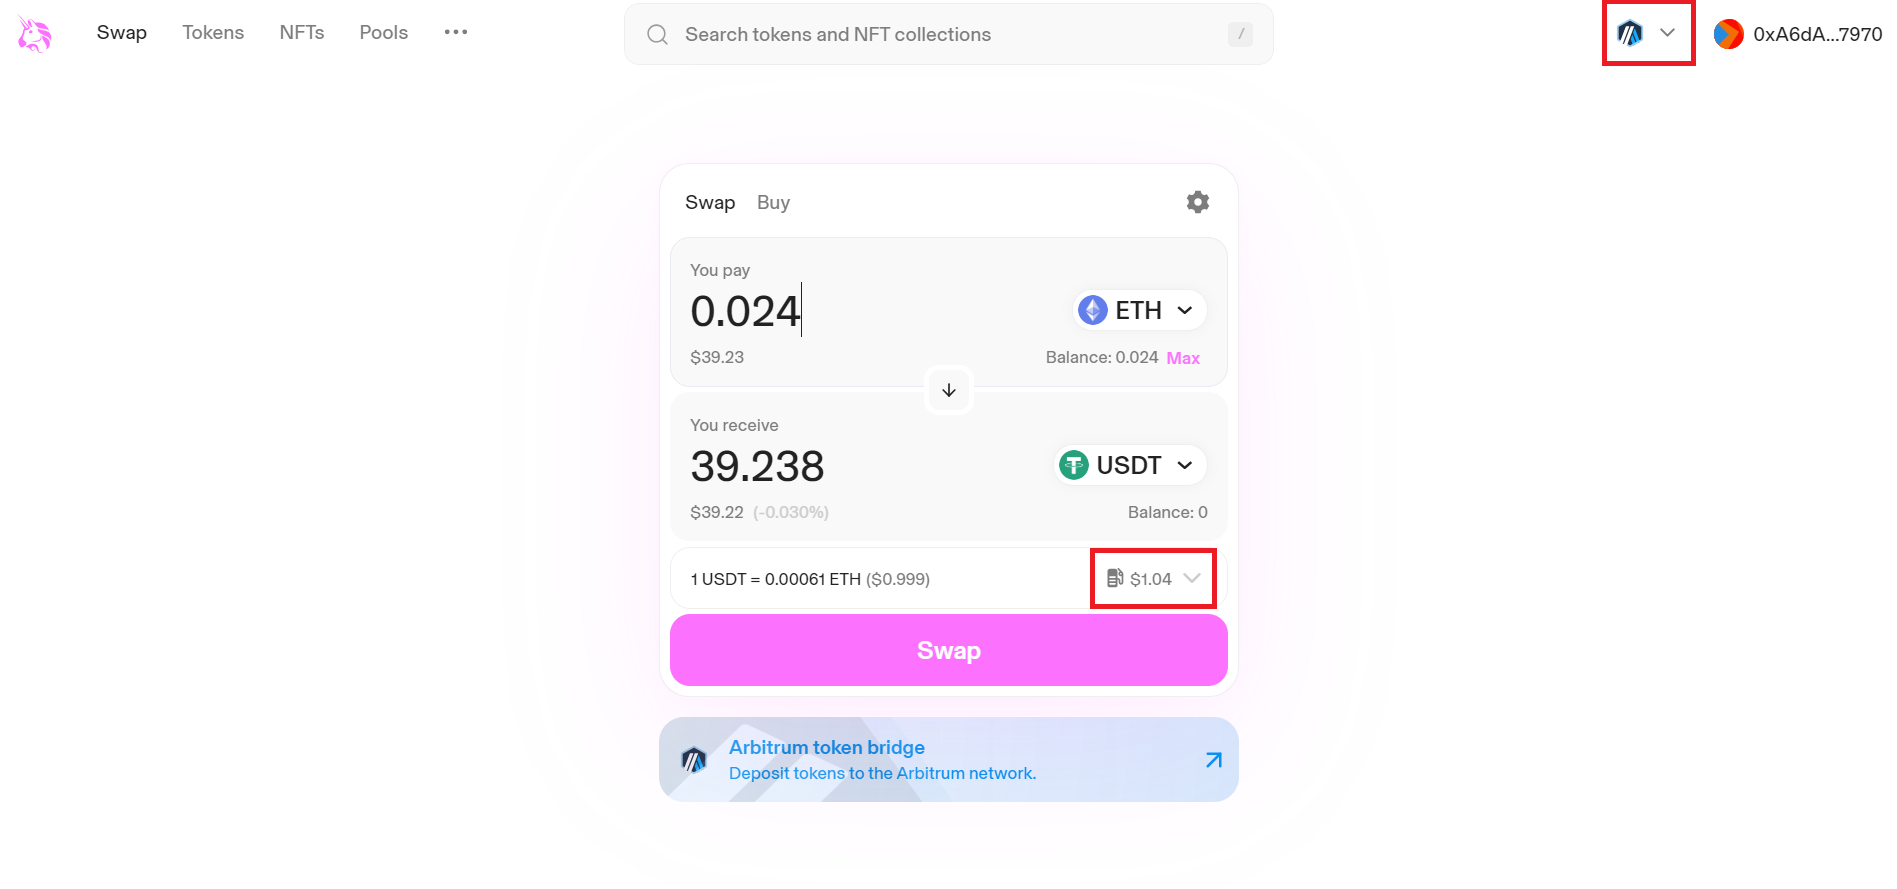
Now for Uniswap, the savings are smaller as the cost is still about a dollar’s worth of Ethereum, but that’s still only half of what we were paying on the Etheruem mainnet.
If you wish to explore different applications that you can access on the Arbitrum ecosystem, you can do so here:
Arbitrum One is the chain that was presented above, and is what is usually meant when Arbitrum is referred to. Arbitrum Nova is an even higher throughput L2 solution that sacrifices centralisation and is designed for games connected to the Ethereum ecosystem. Note that there is always a risk of losing some money. Therefore, it is smart to have two different addresses, one for a quasi-savings account and one for spending money and to interact with DeFi through the spending money account. In this case if you are somehow compromised, you do not lose your savings.
Other L2 solutions#
Other prominent L2 solutions include Polygon, which was the largest L2 solution before being surpassed by Arbitrum. Polygon boasts withdrawal times of approximately 3 hours. They provide several L2 solutions that utilize various technologies, including a distinct approach to rollups known as zero knowledge proofs (zk for short). Zero knowledge solutions are significantly more mathematically complex, and they are subject to ongoing innovation since the mathematics behind zero knowledge proofs is an actively researched field.
Polygon Bridge: Bridge Assets from Ethereum to Polygon zkEVM
Another common L2 solution is Optimism, it is the third largest L2 solution after Polygon and Arbitrum. Optimism has a withdrawal time of a week, and uses the ‘optimistic rollup’ approach we discussed earlier, as the name may hint.
Next tutorial#
In the next tutorial we deal with a section of DeFi that we have yet to discuss - NFTs. We will look at how they’re sold, how to buy them, what they are and what you own when you buy an NFT. Finally, we will learn how to create our own NFTs.